
Counted cross stitch is a traditional embroidery craft that involves creating patterns on fabric using X-shaped stitches. It’s easy to learn, meditative, and perfect for all skill levels.
1.1. What is Counted Cross Stitch?
Counted cross stitch is a traditional embroidery technique where X-shaped stitches are sewn onto fabric following a pattern. It involves counting threads to create intricate designs, making it both precise and rewarding. Suitable for beginners and experienced crafters alike, it offers a meditative and creative outlet, with patterns ranging from simple to complex designs.
1.2. Benefits of Learning Counted Cross Stitch
Learning counted cross stitch is a rewarding hobby that fosters creativity and relaxation. It’s easy to learn, making it accessible to all skill levels. The repetitive nature of stitching can be meditative, reducing stress. Additionally, it allows for the creation of personalized, unique pieces, providing a sense of accomplishment and pride in handmade work.
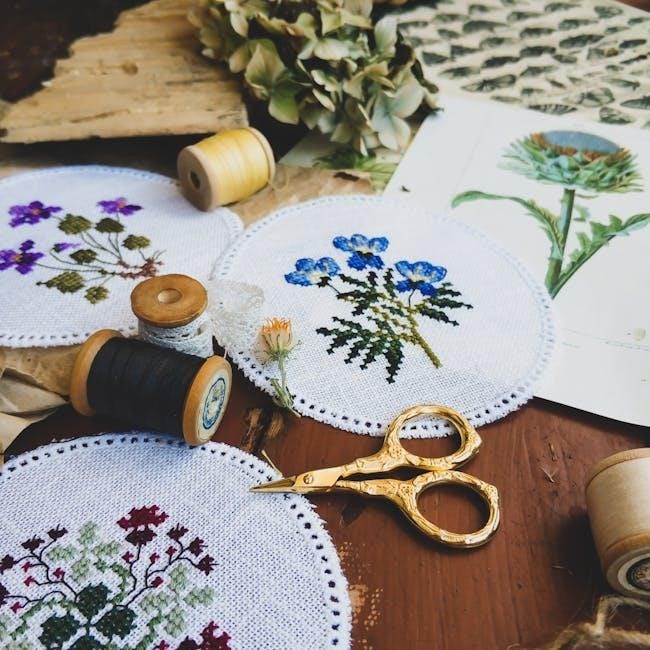
Materials Needed for Counted Cross Stitch
Essential materials include fabric (Aida, Evenweave, or Linen), embroidery floss, sharp tapestry needles, and stitching hoops for ease and precision.
2.1. Fabric Types (Aida, Evenweave, and Linen)
Aida cloth is soft and ideal for beginners, with visible weaves for easy stitching. Evenweave fabric offers a smooth, tightly woven surface for intricate designs. Linen, the most durable, provides a traditional feel and is perfect for experienced stitchers seeking a classic look.
2.2. Thread and Floss Selection
Choose high-quality cotton floss for vibrant colors and durability. Select floss that complements your fabric type and pattern. Opt for stranded cotton for intricate designs or pearl cotton for a textured look. Always cut floss into manageable lengths and use a needle threader for ease. Ensure your threads are colorfast to prevent dye bleeding during washing.
2.3. Needles and Hoops
Use sharp, thin needles for cross stitch, preferably beading or tapestry needles. A hoop or frame keeps fabric taut, ensuring even stitching. Choose a hoop size that fits your project comfortably. Secure the fabric tightly but not overly so to avoid distortion. Replace needles periodically to maintain sharpness and prevent thread damage.
Understanding the Pattern
Understanding the pattern is crucial for accurate stitching. It guides the design layout, ensuring alignment and symmetry. Start by matching the pattern’s center with the fabric’s center for proper placement.
3.1. Reading a Cross Stitch Chart
Reading a cross stitch chart involves understanding its grid system, where each square represents a stitch. Match the pattern’s center to the fabric’s center for alignment. Symbols and colors guide thread selection. Count squares to ensure accuracy, and use highlights to track progress. This method ensures precise stitching and helps bring the design to life effectively.
3.2. Symbols and Colors in the Pattern
In a cross stitch chart, symbols and colors are essential guides. Each symbol represents a specific stitch type, while colors indicate the thread or floss to use. These elements help maintain the design’s integrity and ensure accurate stitching. Referencing the legend is crucial for matching symbols to stitches and colors to threads, guaranteeing the project turns out as intended.

Preparing Your Fabric
Wash and cut your fabric to size, ensuring it’s clean and free of oils. For even stitching, center your design by folding the fabric evenly.
4.1. Cutting and Washing the Fabric
Cut fabric slightly larger than needed and wash in cold water with mild soap to remove sizing and impurities. Gently blot excess moisture and allow to air dry before stitching. This ensures a clean, stable surface for your design, preventing shrinkage and color bleeding during the stitching process.
4.2. Finding the Center of the Fabric
Fold the fabric diagonally to find the center point, then fold again to confirm. Lightly crease or pin the center to align it with your pattern. This ensures your design is evenly positioned, preventing it from running off the edges. Matching the pattern’s center to the fabric’s center is essential for a balanced project.
Setting Up Your Workspace
A well-organized workspace is key to enjoyable stitching. Use a hoop or frame to keep fabric taut, ensuring good lighting and a clean, distraction-free area.
5.1; Using a Hoop or Frame
A hoop or frame keeps fabric taut, making stitching easier. Choose a size that fits your project, ensuring easy access to the stitching area. Tighten evenly to prevent distortion.
5.2. Securing the Fabric Properly
Secure fabric tightly in a hoop or frame to maintain even tension. Ensure fabric edges are straight and smooth. Adjust regularly to prevent puckering. This setup helps achieve accurate, consistent stitches and reduces eye strain during long stitching sessions. Proper securing is key for a professional finish and enjoyable stitching experience for beginners and experts alike.
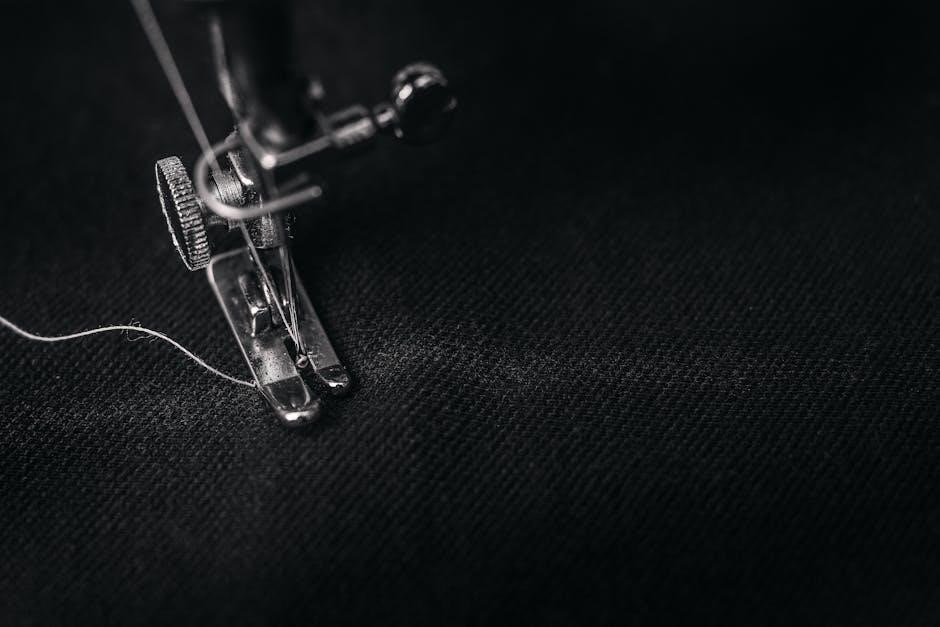
Basic Stitching Techniques
Mastering the full cross stitch and backstitch is essential. These foundational stitches form the basis of most patterns, requiring consistent tension and careful placement for professional results.
6.1. The Full Cross Stitch
The full cross stitch is the most common stitch, creating an “X” shape. Start by bringing the needle up at the left hole of the square, then down at the right, forming the first diagonal. Next, bring the needle up at the right hole and down at the left, completing the cross. Keep tension even to avoid fabric distortion.
6.2. The Backstitch
The backstitch is used for outlining and creating straight lines in your design. It’s stitched in a continuous motion, moving from left to right. Start by bringing the needle up, insert it a few squares ahead, and stitch backward to complete the line. Keep the fabric taut to ensure straight, even stitches. This stitch is reversible, making it ideal for details and text. Maintain even tension to prevent puckering.

Tips for Accurate Stitching
Maintain even tension while stitching to avoid fabric puckering. Use the pattern for accuracy and count stitches carefully to ensure designs align properly and consistently.
7.1. Maintaining Even Tension
Maintaining even tension is crucial for a smooth finish. Keep the fabric taut but not overly tight, as this can distort the stitches. Avoid pulling the thread too tightly, as it may pucker the fabric. Work in small sections and regularly check the backside of your work to ensure consistency. Even tension ensures your design lies flat and looks professional.
7.2. Avoiding Long Jumps on the Back
Long thread jumps on the fabric’s back can create bulk and visible lines. Instead, use short, gentle thread bridges to connect distant stitching areas. This prevents unsightly lumps and keeps the back neat. Always trim excess thread to maintain a clean finish and avoid loose ends that could interfere with your stitching progress. This ensures a professional-looking project both front and back.

Starting Your First Stitch
Begin by coming up through the fabric near the center, leaving a small loop on the back. Sew back diagonally to anchor the thread securely.
8.1. Threading the Needle
Carefully cut a length of thread and insert one end through the needle’s eye. Gently pull to secure, leaving a small loop on the back. Keep the needle straight to avoid tangling. This method ensures a smooth start and prevents thread damage. Always use a sharp, beveled needle for easier fabric penetration and minimal risk of thread breakage.
8.2. Anchoring the Thread
Bring the needle up through the fabric, leaving about an inch of thread on the back. Secure the thread by stitching over it with small, gentle stitches. Avoid tying knots, as they can cause bulk. Instead, use a waste knot or loop to anchor the thread neatly. This ensures a clean start and prevents thread slippage.
Working in Rows
Working in rows is a common approach in counted cross stitch. Start stitching from the center or left side, moving in a consistent direction for even results.
9;1. Stitching from Left to Right
Stitching from left to right is a common method in cross stitch. Start near the center and work in rows, maintaining even tension. This approach ensures consistent progress and reduces errors. Use a hoop or frame for stability and count stitches carefully to stay accurate. This technique helps in managing thread and keeping track of your design efficiently.
9.2. Keeping Track of Your Progress
Track your progress by following the pattern and marking completed stitches. Use a highlighter or digital tools to mark finished areas. Count stitches as you go to ensure accuracy. Maintain momentum by completing one row at a time. This method helps stay organized and motivated, ensuring your project grows steadily and correctly;
Managing Thread and Floss
Efficiently manage thread and floss by cutting appropriate lengths and organizing colors. Use bobbins or floss cards to keep threads tidy and prevent tangles during stitching.
10.1. Cutting and Using Thread Lengths
Cut thread into manageable lengths to avoid tangling and waste. Use 12–18 inches for stitching, securing ends neatly. Longer threads risk knotting, while shorter lengths are harder to handle. Keep your workspace clean and organized to prevent losing small pieces. Proper thread management ensures smooth stitching and reduces frustration, especially for beginners learning the craft.
10;2. Organizing Floss
Organize floss by winding it neatly on cards or storing it in small, labeled bags. This prevents tangles and makes it easy to find the right color. Use a floss box or binder with slots for each skein, keeping them sorted by color or pattern. A well-organized workspace saves time and reduces frustration while stitching.
Counting Stitches
Counting stitches is crucial for accurate cross stitch work. It ensures your design aligns perfectly with the pattern. Use the pattern guide to maintain precision and avoid errors.
11.1. Using the Pattern for Accuracy
Always refer to the pattern for precise stitching. Align your fabric’s center with the chart’s midpoint to ensure symmetry. Use symbols and colors to guide each stitch, maintaining consistency. Counting accurately prevents misalignment and ensures your design mirrors the pattern perfectly. This step is vital for achieving professional-looking results in your cross stitch project.
11.2. Counting Techniques
Use the pattern to count stitches meticulously. Mark completed areas to track progress. Employ tools like highlighters or apps to stay organized. Counting techniques ensure accuracy and reduce errors. Maintain even tension and avoid long thread jumps. Start from the center and work outward for symmetry. These methods help you achieve precise, professional results in your counted cross stitch project.

Finishing Touches
Gently wash your project in cold water with mild soap, then iron it while slightly damp. Frame or mount your work to showcase it proudly, preserving your stitching efforts.
12.1. Washing and Ironing the Finished Project
After completing your counted cross stitch, hand wash the fabric in cold water with a small amount of mild detergent. Gently swish the fabric, avoiding scrubbing. Rinse thoroughly and pat dry with a clean towel. Iron the fabric on the reverse side while it’s still slightly damp to remove wrinkles and even out the stitches, ensuring a professional finish for your artwork.
12.2. Framing or Displaying Your Work
To showcase your finished counted cross stitch, choose a frame that complements the design. Use acid-free mats and UV-protective glass to preserve colors and prevent fading. Mount the fabric on a sturdy backing board to maintain its shape. Select a frame slightly larger than the fabric for a polished look. Avoid direct sunlight to ensure your artwork remains vibrant for years to come.

Common Mistakes and Solutions
Common errors include miscounting stitches and uneven tension. To fix, re-count stitches using the pattern and adjust tension by gently tightening or loosening threads as needed.
13.1. Miscounting Stitches
Miscounting stitches is a common issue, especially for beginners. To avoid this, always use the pattern for accuracy and count carefully. Starting from the center reduces errors. If you miscount, gently remove stitches and rework the area. Regularly verifying your progress ensures the design remains intact and aligned correctly.
13.2. Uneven Tension
Uneven tension can distort the fabric and misalign stitches. It occurs when stitches are too tight or too loose. To fix this, use a hoop or frame to maintain consistent tension. Stitching in the same direction and keeping the fabric taut but not overly tight helps. Regularly check your work to ensure even stitching and adjust as needed for a smooth finish.
Quick-Start Guide
Start by finding the fabric’s center, use a hoop for stability, and keep hands clean. Stitch consistently, maintain even tension, and follow the pattern closely for success.
14.1. Essential Tips for Beginners
Begin with a simple pattern and 14-count Aida fabric. Use a hoop to keep fabric taut and thread your needle with 18-24 inches of floss. Start stitching from the center, maintain even tension, and count carefully. Keep hands clean to avoid fabric stains and wash the finished project gently before framing.
14.2. Recommended First Project
A small, simple design on 14-count white Aida fabric is ideal for beginners. Choose a pattern with minimal colors and clear symbols. Start with a motif like a single flower or basic shape to practice stitching and counting. This will help build confidence and skills for more complex projects later on.
Additional Resources
Explore online tutorials, communities, and forums for step-by-step guides, tips, and inspiration. Websites and blogs offer free patterns, video lessons, and expert advice for all skill levels.
15.1. Online Tutorials and Videos
Online tutorials and videos provide step-by-step guides for learning counted cross stitch. Platforms like YouTube and stitching blogs offer lessons for beginners, covering basics like threading needles, stitching techniques, and reading patterns. Many creators share tips for improving speed and accuracy, making it easier to master the craft from home. These resources are invaluable for visual learners and those seeking hands-on guidance.
15.2; Communities and Forums
Joining online communities and forums connects you with fellow cross stitch enthusiasts. Platforms like Floss Tube and stitching groups on Reddit offer inspiration, tips, and support. These spaces allow you to share projects, ask questions, and learn from experienced stitchers. They’re great for troubleshooting, staying motivated, and discovering new patterns and techniques to enhance your stitching journey.